How to Choose the Right Baby Play Gym for Your Little One
Choosing the right baby play gym is more than just picking a cute mat with toys. It’s about finding a safe and fun space that supports your baby’s development during the most important early months. From encouraging tummy time and boosting motor skills to offering sensory play, the best baby gyms and newborn activity gym help your little one grow through movement and discovery.
But with so many choices like activity gyms, play mats, and full play spaces, how do you know which one fits your baby’s needs? This guide breaks it down for you. Whether you want a boho style, a Montessori-inspired setup, or a 4-in-1 gym that adjusts as your baby grows, you’ll learn exactly what to look for to make playtime safe, simple, and meaningful.
What Is a Baby Play Gym?
A baby play gym is a padded mat with hanging toys designed to support tummy time, playtime, and child development. Many play gyms come with arches, rattles, teethers, and crinkle toys. Some models include music, lights, and textured playmats for sensory experiences.
You’ll find popular options like the Lovevery Play Gym, Skip Hop, and Fisher-Price, which are trusted for their thoughtful designs and baby-safe materials.
Key Features to Look for in a Baby Play Gym
When choosing the right baby play gym, look at how it helps your baby grow while staying safe and easy to use.
1. Safe and Non-Toxic Materials
Always choose a play mat for your baby that is non-toxic and baby-safe. Look for products made with organic cotton, foam baby materials that are wipe-clean, and even machine washable surfaces for easy cleanup.
2. Tummy Time Support
Tummy time mats help strengthen your baby’s neck and shoulder muscles. A tummy time area should have plush support and engaging toys like maracas, teethers, and high-contrast visuals to make tummy time more enjoyable.
3. Sensory and Developmental Toys
The best activity gyms offer sensory toys like rattles, crinkles, or music-playing elements. Toys that play music, light up, or involve cause and effect keep your baby engaged. Some toys hang dangling above your baby to encourage them to reach and bat, which helps develop fine motor skills.
4. 4-in-1 and Stage-Based Designs
Many activity centers are 4-in-1, growing with your baby from newborn to toddler. These may include a bouncer, jumper, or play piano gym. Choose stage-based options that adapt to your baby’s needs over time.
5. Easy Storage and Portability
A foldable play mat or gym with detachable toys offers easy storage and flexibility. Some play areas are easy to store, lightweight, and perfect for travel or small spaces.
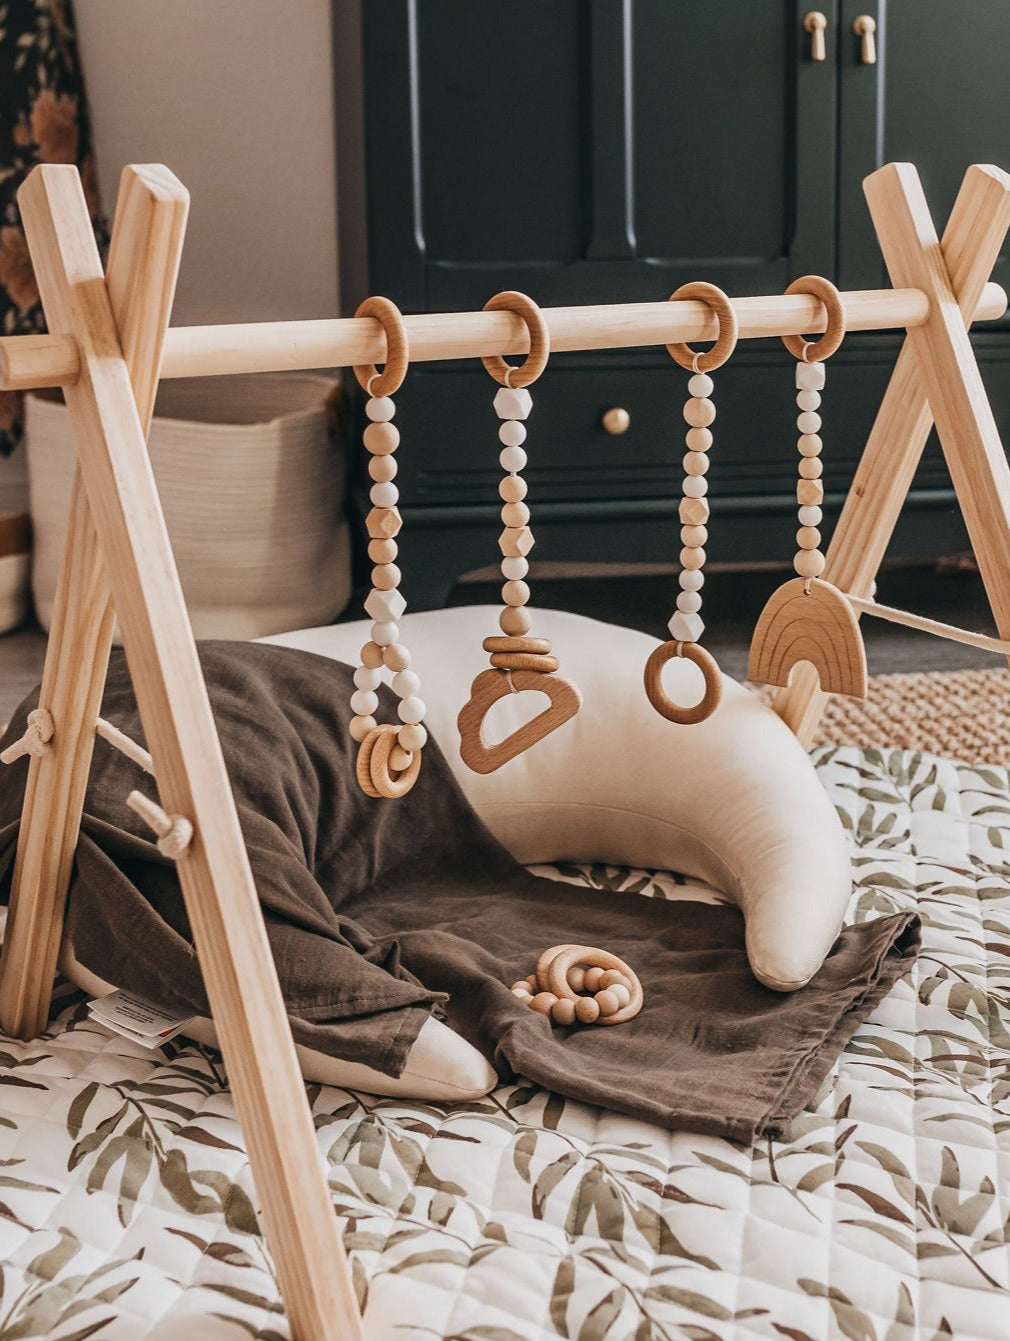
Natural and Minimalist Baby Gym Option
A soft, stylish, and practical choice for parents who want simplicity.
If you prefer a clean and calm play space, look for a wooden baby gym with a simple design. These often feature a sturdy wooden frame, soft plush baby play mat, and a small set of detachable toys made from baby-safe, non-toxic materials.
The playmat is usually machine washable, foldable, and padded enough for comfortable tummy time, rolling, and early crawling. The hanging toys are designed to support sensory exploration, motor skills, and cause-and-effect learning without being overstimulating. This kind of setup works well from newborn to toddler and fits in with both small spaces and modern interiors.
Tips for Choosing the Best Baby Gym for Your Family
Here are a few final reminders to help narrow down your choices.
Think About Your Space
Do you have room for a large activity center, or do you need a foldable playmat that tucks away easily? Some parents prefer foam play mats or mats for babies that can double as a play space or gym.
Consider Your Baby’s Age and Stage
Younger infants benefit from high-contrast playmats and gentle tummy time support. As your baby grows, features like a jumper and a bouncer could add more value.
Choose Multi-Use Designs
Look for 4-in-1 models or deluxe gyms that offer more than one function, like music, lights, and detachable toys. These options provide more ways to keep your baby entertained.
Don’t Forget Cleanup
A machine-washable or wipe-clean baby mat makes life much easier. Babies can be messy during playtime, so easy cleanup is a must.
Help Your Baby Thrive
A great baby play gym does more than keep your little one busy. It supports early skill development, builds strength, and makes tummy time more enjoyable. Whether you’re looking for a soft plush setup, a Montessori-inspired activity mat, a boho playmat, or a playful piano gym, there is an option that fits your space and your baby’s needs.
As your baby grows, you need a setup that is safe, fun, and encourages learning through movement and play. Choose a gym that helps your baby reach and bat, start making sounds, and explore their surroundings. It should also be easy to clean, store, and adjust as your child develops.
If you want something simple, safe, and well-designed, Poppyseed Play has baby products that support every stage from newborn to toddler. Message us now to find the right baby play mat or activity gym for your family.